

This page contains all kinds of delicious treats and fun projects. Scroll down to find:
- Racing inspired gingerbread cookies
- KillaJoule/Green Envy cookie cutter (3D printable)
- No-bake oat and cocoa treats.
- Green Envy Easter Egg (3D printable)
- 3D print your own Green Envy or KillaJoule – with a matching Eva! Or make a KillaJoule from paper!
1. Racing inspired gingerbread cookies
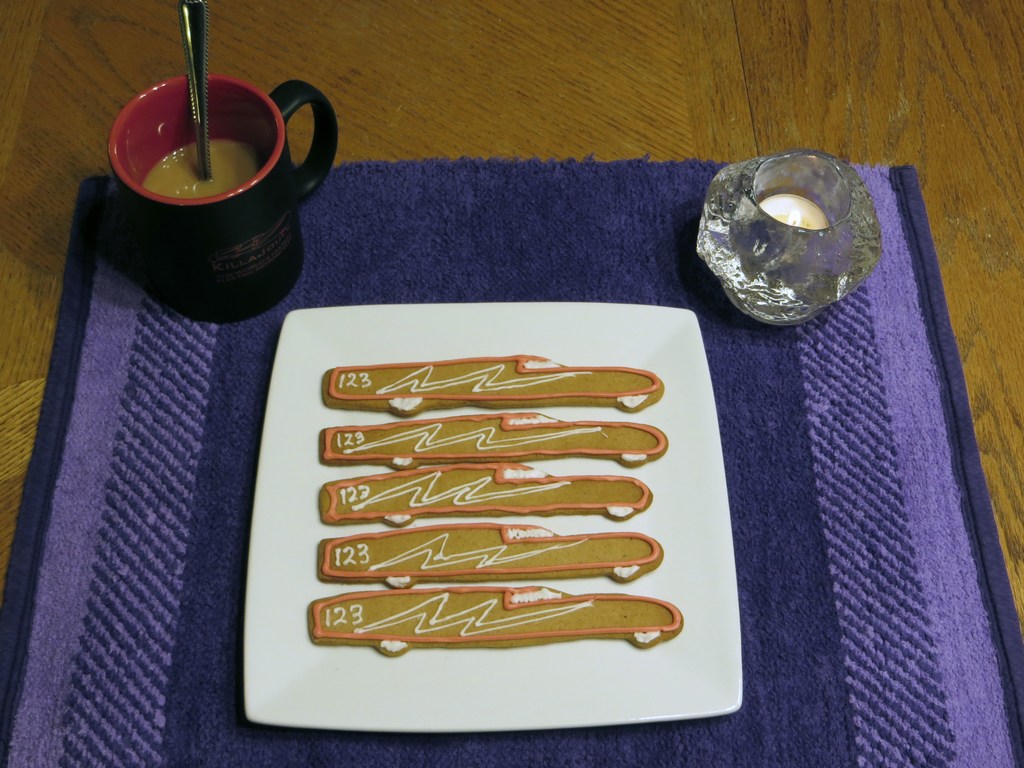
Gingerbread cookies are my absolute favorite cookies, and the best I have ever tasted are my grandma Carla’s. You will find the recipe HERE (PDF, 0.1 MB).
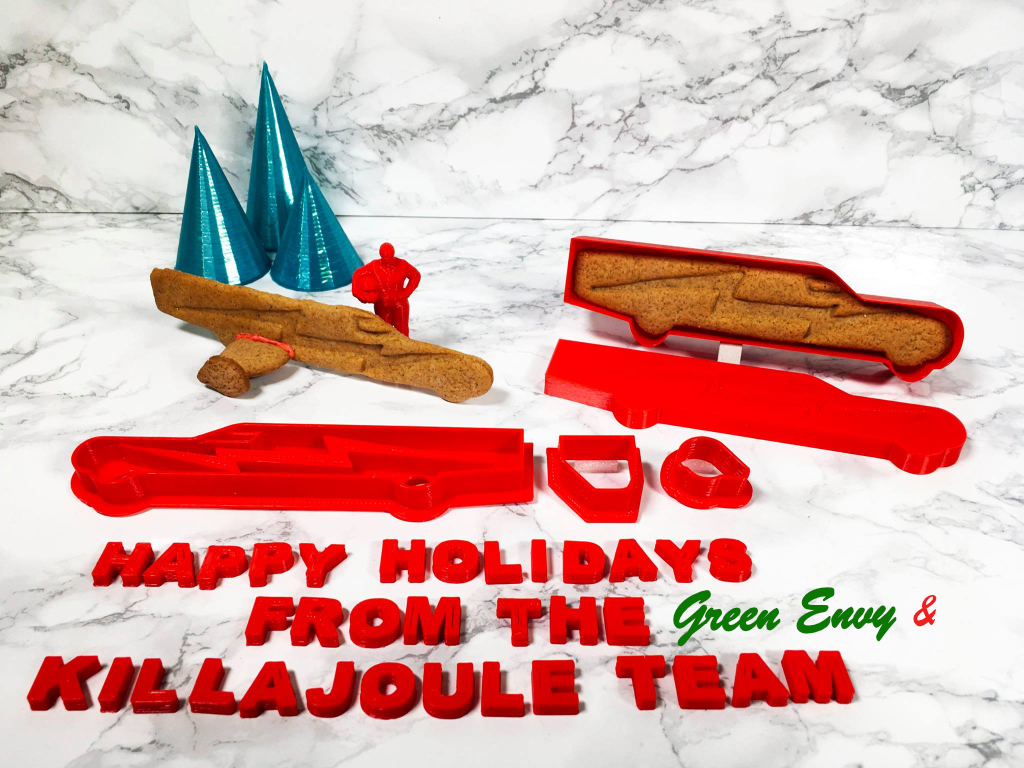
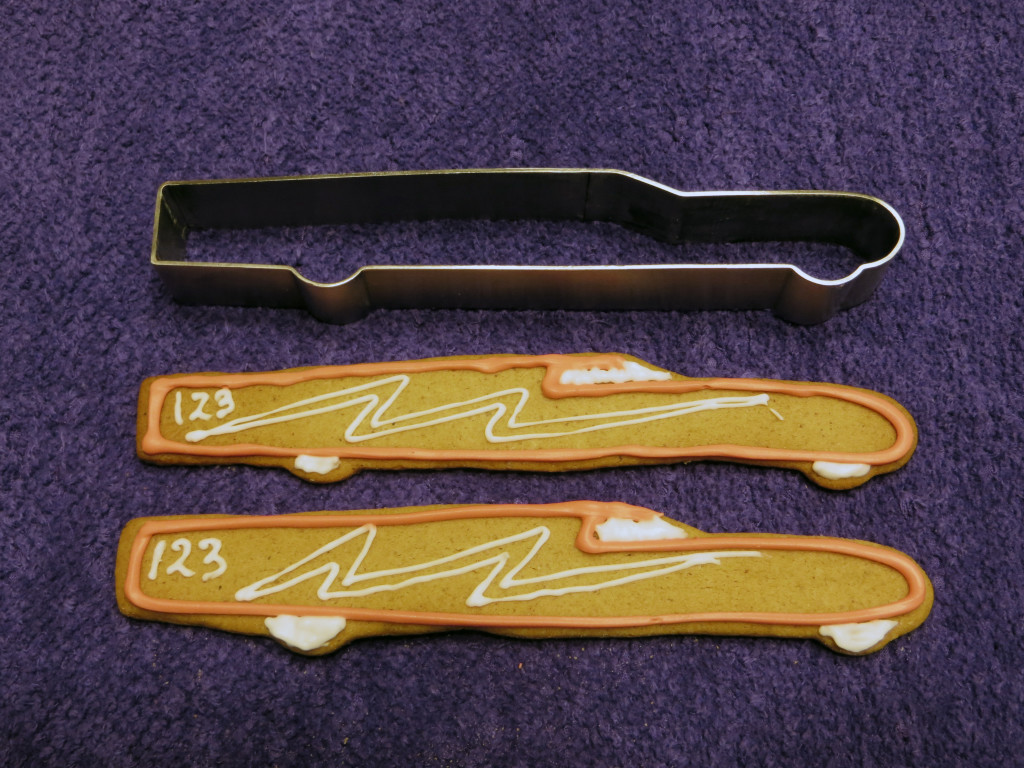
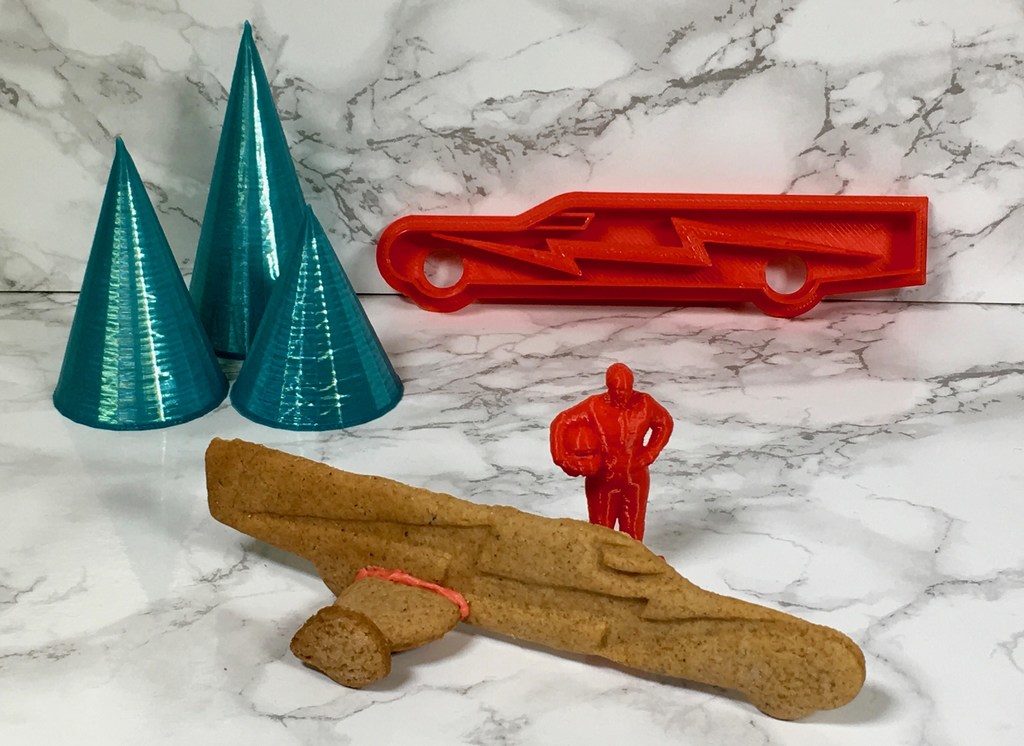
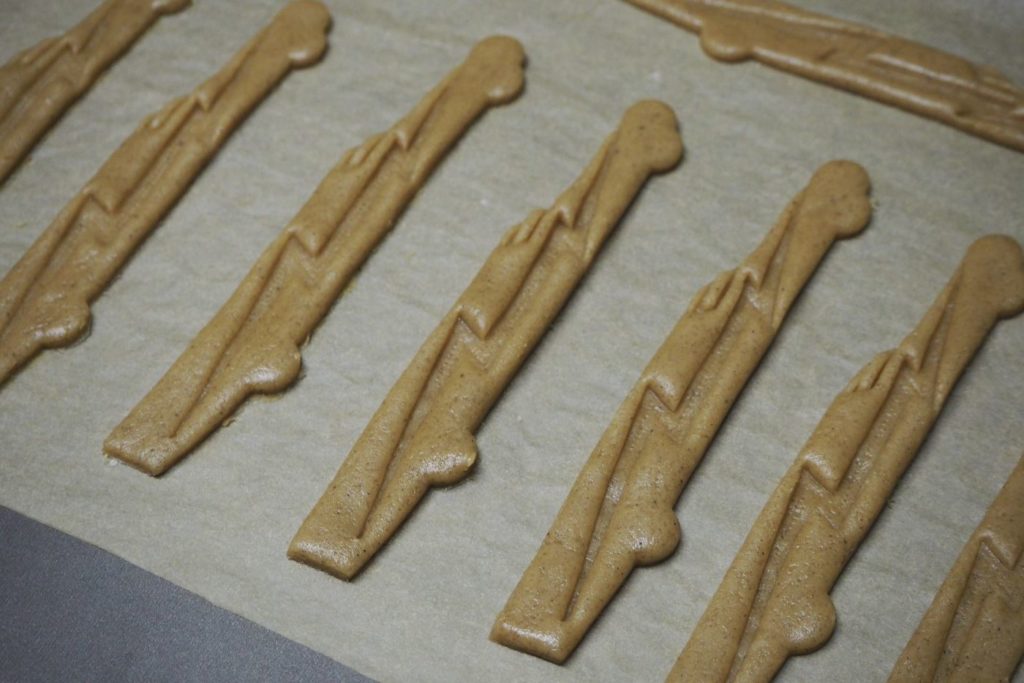
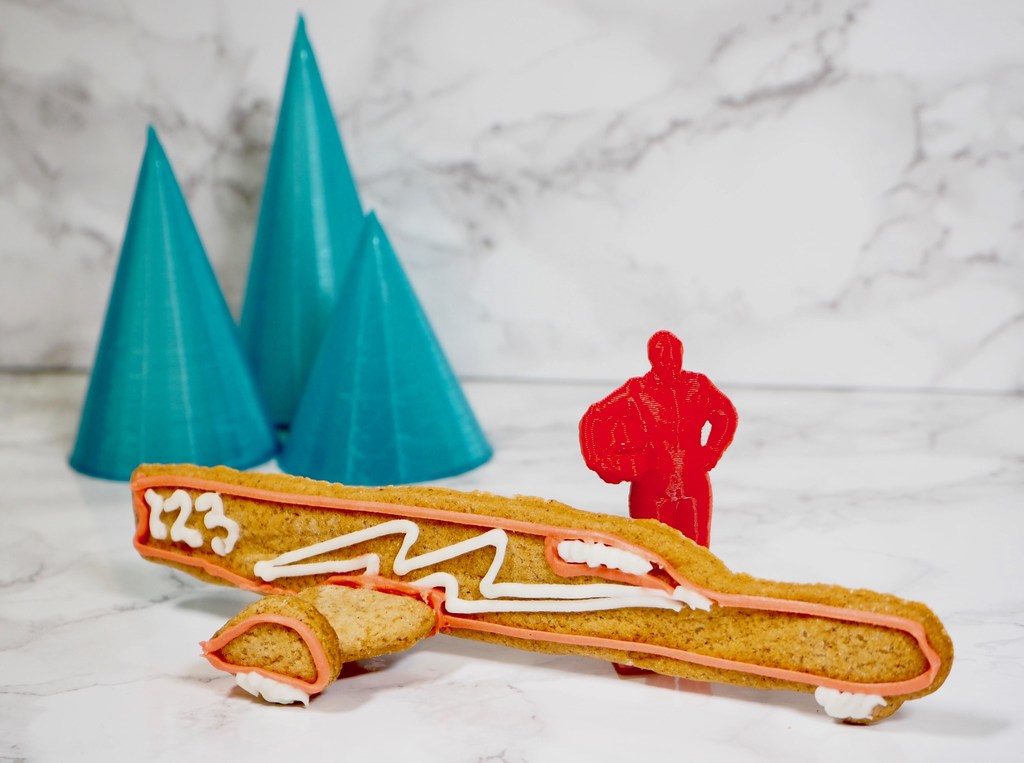
More than half of the fun of making gingerbread cookies are to use fun shapes and to decorate the cookies. The best cookie cutters are made from stainless steel and have really sharp edges. My dad made me the KillaJoule cookie cutter that you can see above. The two cookies above are decorated as the KillaJoule. It is quite a job to make a cookie cutter of this style, and you need to have access to a real workshop.
A simpler alternative is to 3D print your cookie cutter. It doesn’t give as sharp cutting edge and the dough tends to stick to it a bit more, but the possibilities are endless. If you happen to have access to a 3D printer like I have, you don’t have to be fluent in CAD (Computer Aided Design) to print your own cookie cutter. There are many print ready designs that can be downloaded for free from www.thingiverse.com, one of my favorite 3D printing websites. Just search for “cookie” on the website. Of course, if you want just your racing vehicle or favorite pet or any other custom shape, you have to draw it yourself.
If you want to 3D print your own KillaJoule cookie cutter – scroll down the page to read more! 🙂

2. Download and 3D print KillaJoule cookie cutter
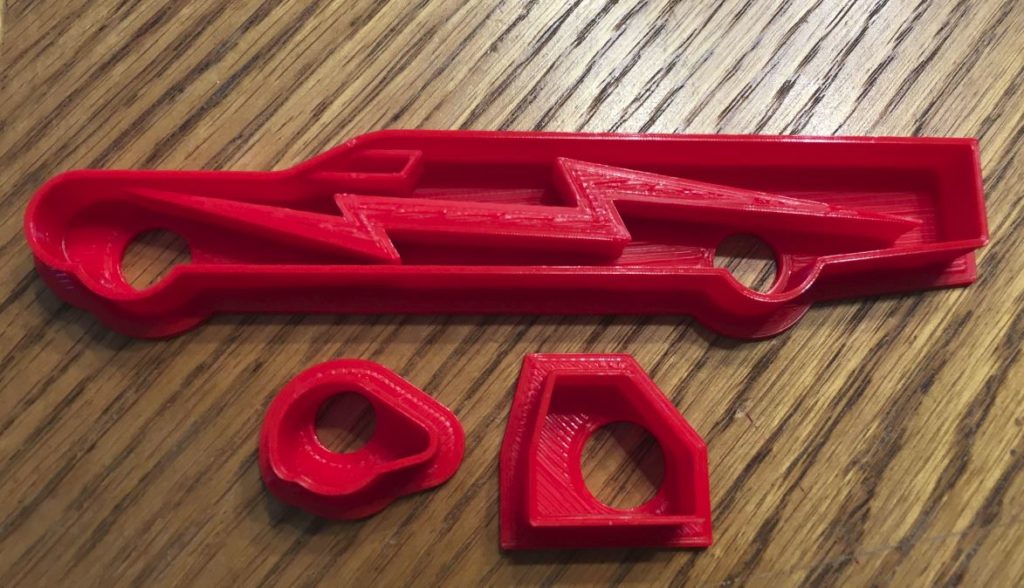
If you are lucky enough to have access to a 3D printer, you can download your own KillaJoule cookie cutter here (.zip file). (I don’t have a Green Envy version yet, but if you use green icing instead of read it will be a Green Envy. 🙂 The compressed folder contains two varieties of the the KillaJoule cookie cutter – with and without imprint of the lightning bolt. It also contains the two cutters to make the sidecar shown in the photos below. If you want to modify the cutters, the original Autodesk Inventor files (.ipt) are also included. The STL files are also available for download for free at https://www.thingiverse.com/thing:1979020.
If you choose to download the ZIP folder, to open the compressed folder (on a PC), right-click and choose “Extract all”. Open or import the .stl files in your 3D printing slicer software (such as Cura or Simplify 3D). Use the slicer software to send the model to your 3D printer. The exact steps depends on your printer and software used.
If you make KillaJoule or Green Envy cookies, please send me a photo – I’d love to see your creation!
Imprint version of the KillaJoule cookie cutter
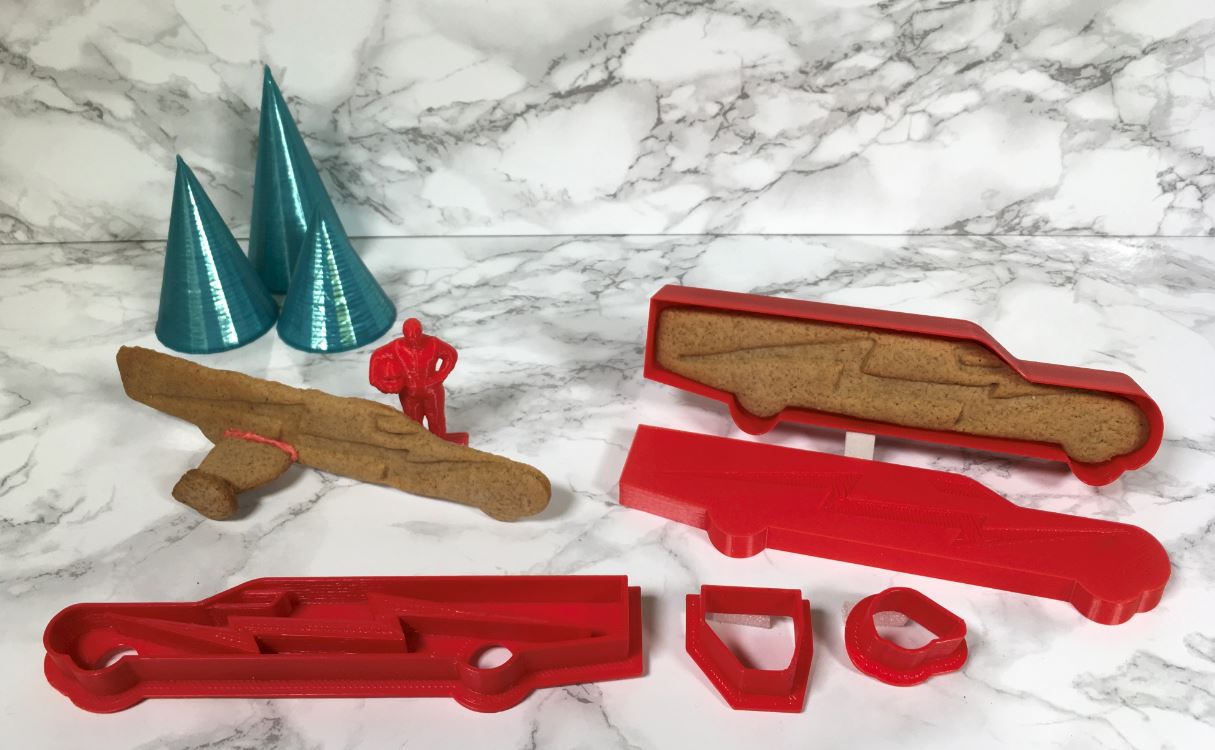
KillaJoule ginger bread cookies. Download the files to 3D print the cookie cutters above.
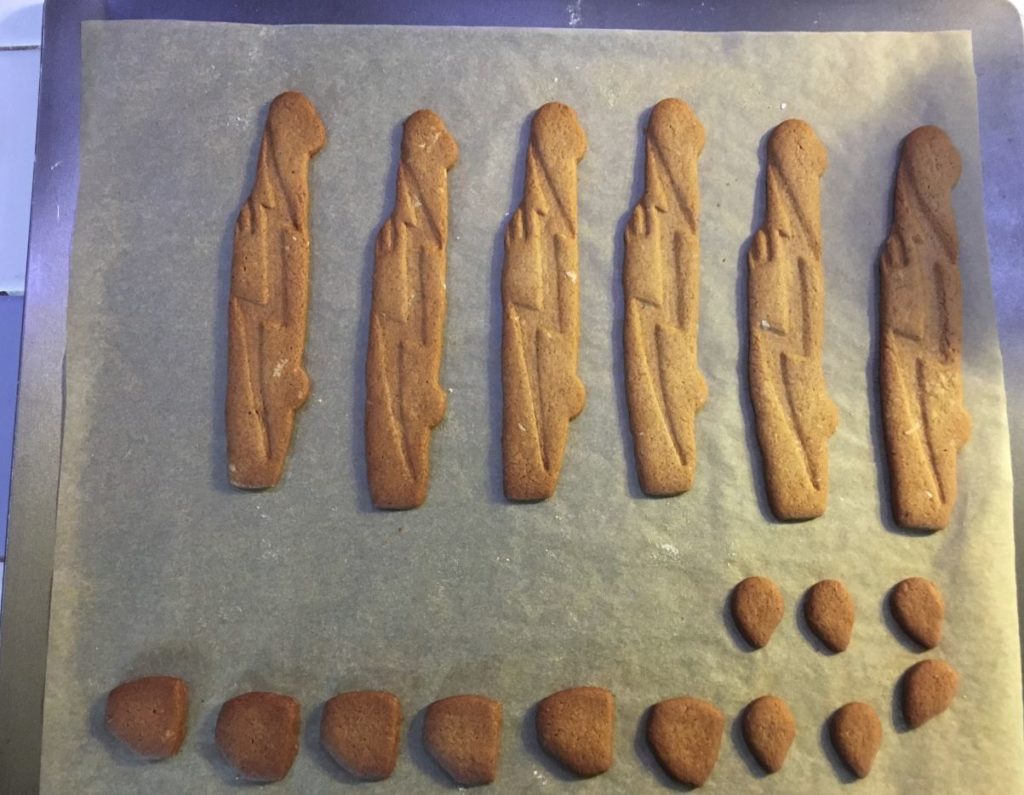
Cookie cutter without imprint
The cookie cutter with imprint is easier to use because the dough doesn’t stick so easily. The cookies may also get more uniform shape, and will be very suitable for decoration.
3. Quick treat or gift: No-bake Oat and Cocoa balls
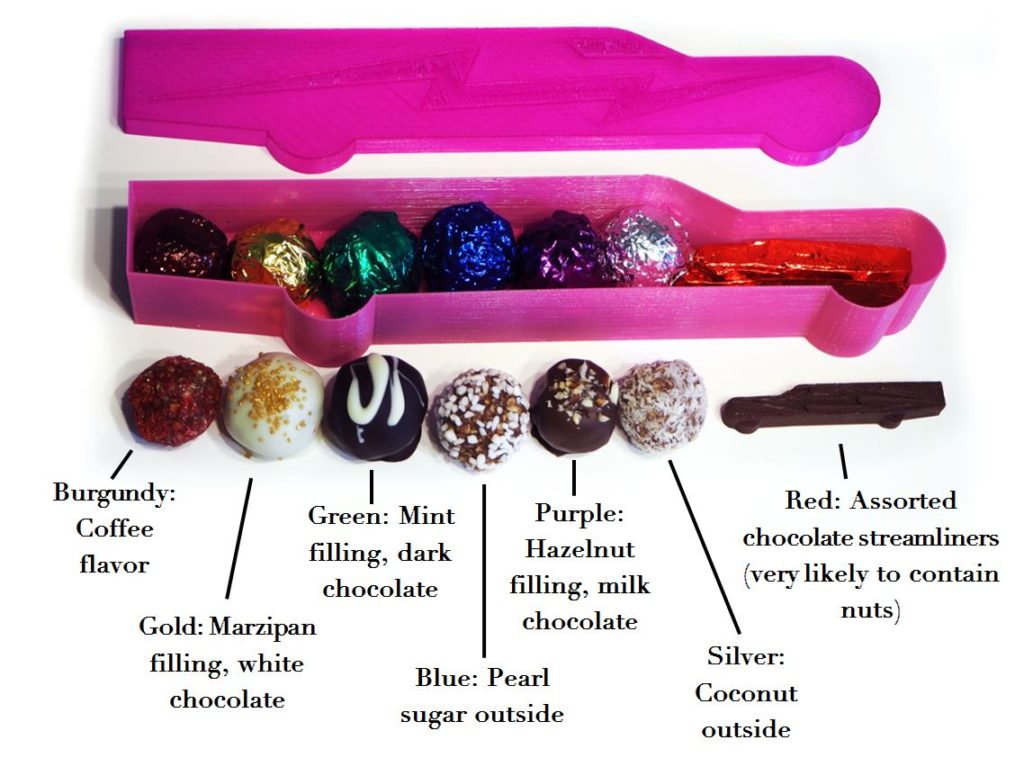
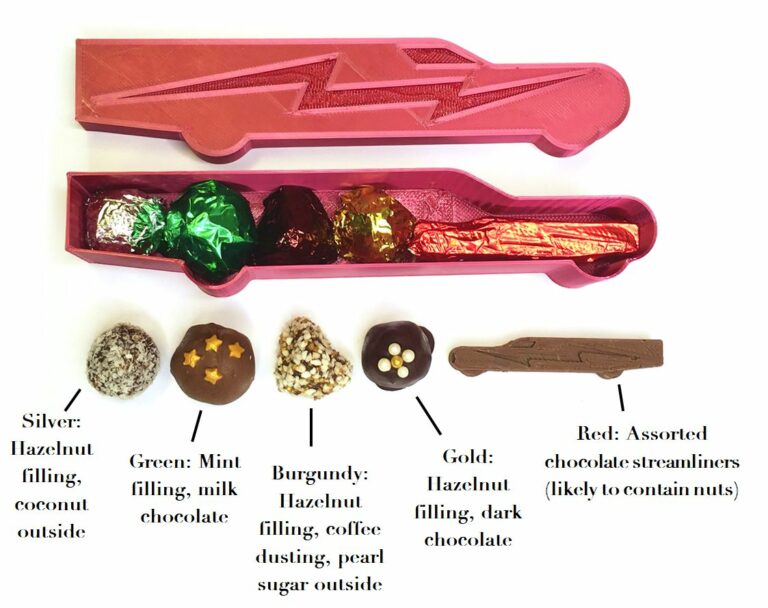
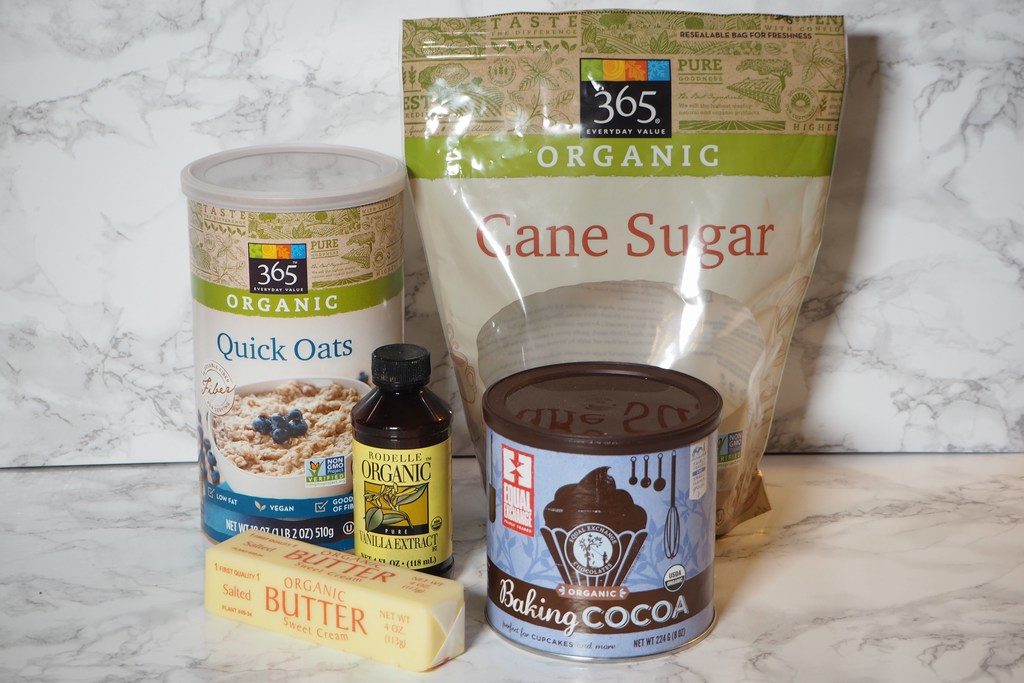
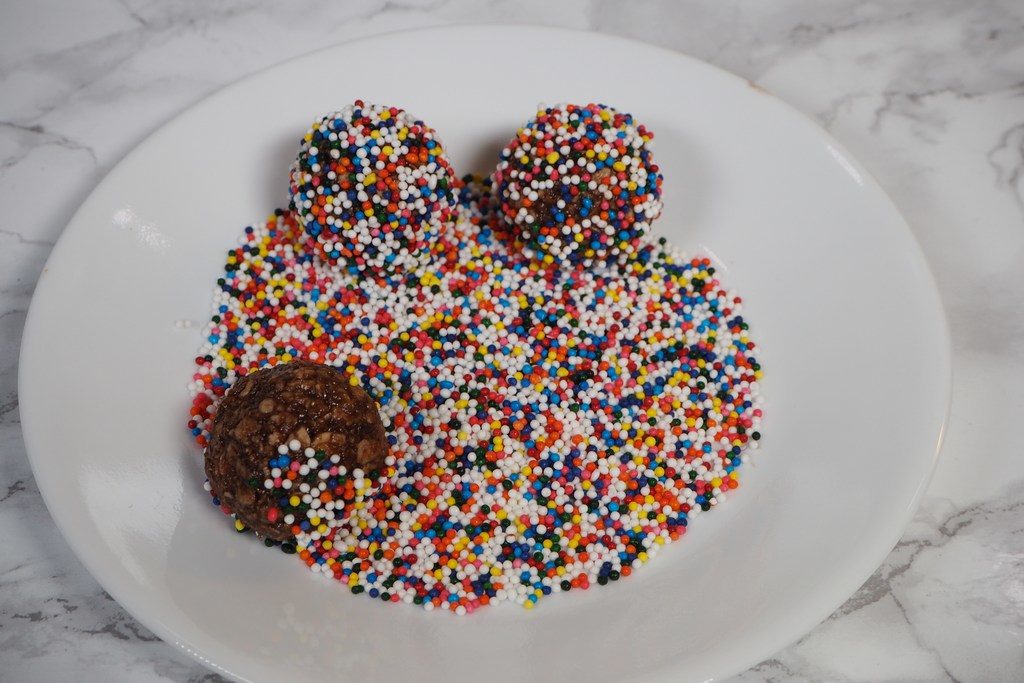
Super simple and super quick Oat and Cocoa Balls is the perfect treat of gift. Just mix all ingredients in a bowl and shape into balls with your hands. Chill and serve. This is the base for the treats shown in the cover photo. It is optional to roll them in sprinkles, shredded coconut, or anything else you can think of, but they are darn good as they are as well.
I always choose organic, local and/or fair trade ingredients if I can, but that I of course a personal preference. If you want a low-sugar option, substitute some or all the sugar for stevia.
I originally designed the container on the photo be be an Easter Egg, but they suits any holiday or celebration. Scroll down below the recipe to come to files and printing instructions how to make the KillaJoule/Green Envy box.
Ingredients for ~20 balls, about 1.25 inch (30 mm) in diameter:
Metric units:
100 g butter at room temperature
0.5-1 dl sugar, granulated or powered (the amount depends on your personal preference)
2 tablespoons of cocoa powder
4 dl rolled oats (quick or regular)
1-2 tablespoons of water
Imperial units:
4 oz butter at room temperature
0.25-0.5 cups sugar, granulated or powered (the amount depends on your personal preference)
2 tablespoons of cocoa powder
1.5 cups rolled oats (quick or regular)
1-2 tablespoons of water
Optional flavoring, such as vanilla or coffee (or liquor for an adult version). The ones in the cover photo had 1 table spoon of liquid vanilla per batch. The coffee ones had one table spoon of instant coffee (dissolved in a small amount of hot water) per batch in addition to the vanilla. Several of the ones shown in the cover photo were also filled or dipped. Here are the additional recipes for the top photo (the bottom photo had some slightly different varieties):
- Burgundy: One table spoon of instant coffee, dissolved in a small amount of hot water, per batch.
- Gold: Formed a ball of marzipan, and surrounded it with the dough. Placed them in the fridge until hard, then quickly dipped in melted white chocolate, placed on tray covered in parchment/baking paper, and sprinkled “gold” sprinkles on top.
- Green: Same idea, but a junior mint in the center, dipped in dark chocolate, and white chocolate stripes on top.
- Blue: Just rolled in “pearl sugar” (can be hard to find, a Scandinavian specialty).
- Purple: Hazelnut in the center, dipped in milk chocolate, and chopped hazelnuts on top.
- Silver: Just rolled in shredded coconut.
Note: a scientifically minded person will notice that the amounts are not identical in metric and imperial units. The recipe is very flexible, and you can adjust the amounts based on your personal preferences.
Step-by-step instructions:
Prefer a printed version? Download the instructions as PDF HERE for easy printing:
Step 1: Gather all the ingredients. I personally prefer organic, local and/or fair trade.
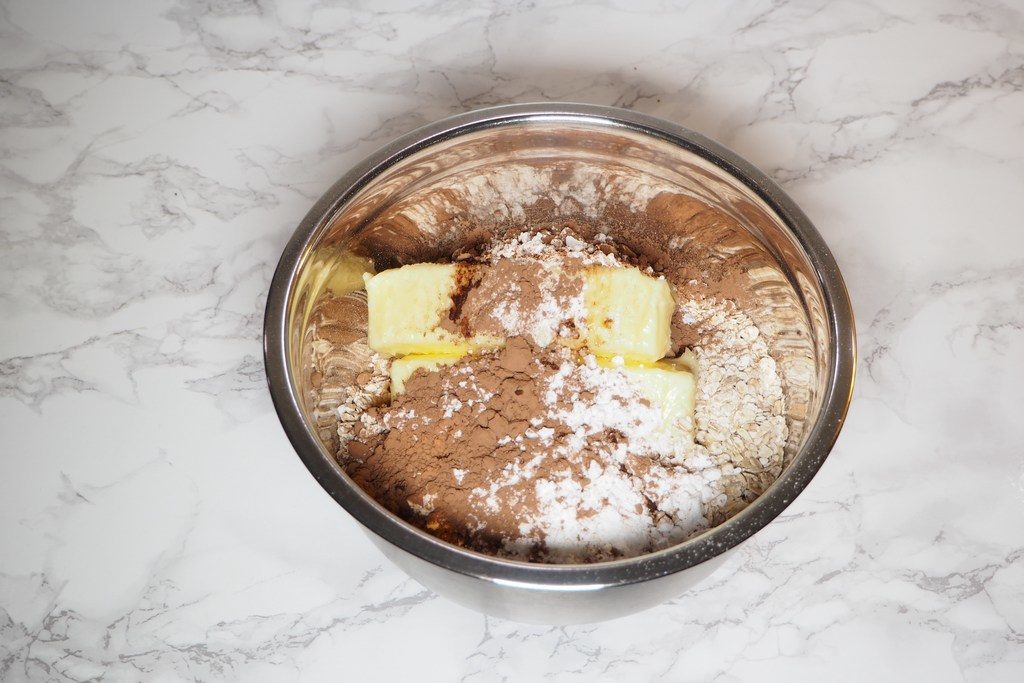
Step 2: Add all ingredients to a bowl.
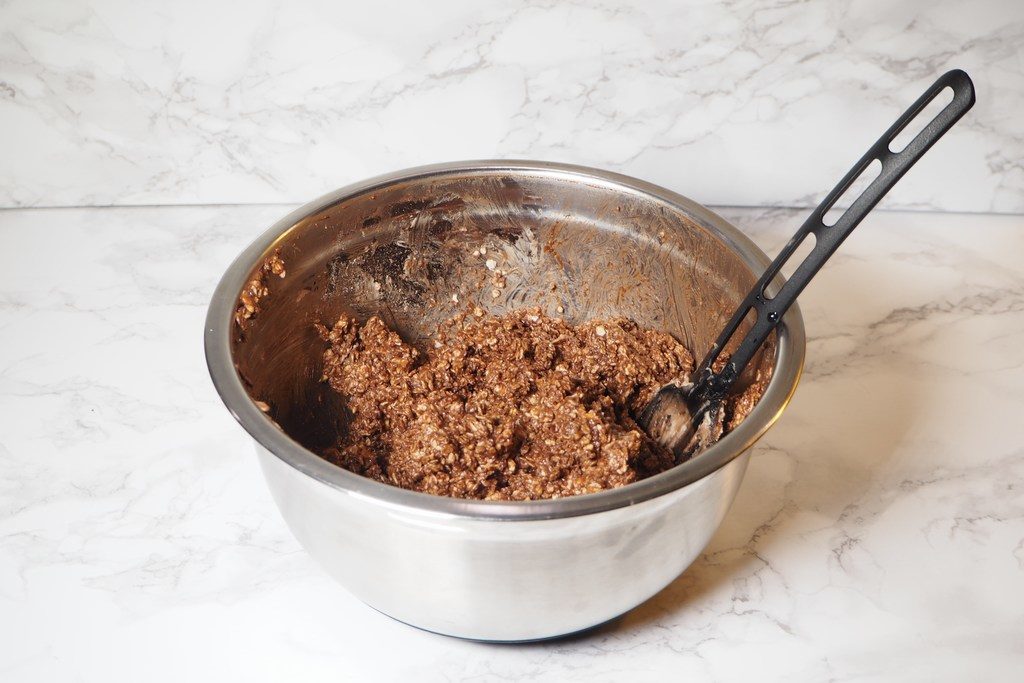
Step 3: Mix it all. If you don’t mind getting your hands messy, it is actually easiest to do this with your hands. I place the bowl in the sink to contain potential mess.
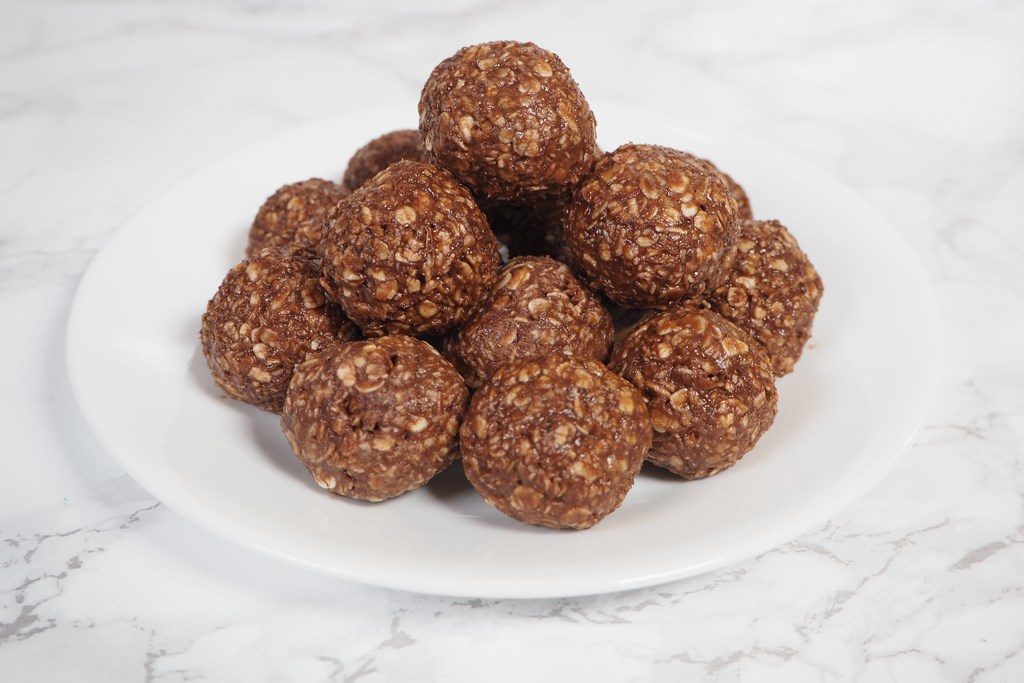
Step 4: Shape into balls using your hands. If it sticks badly to your hands, try to first rinse your hands in cold water. It sticks much less to wet hands.
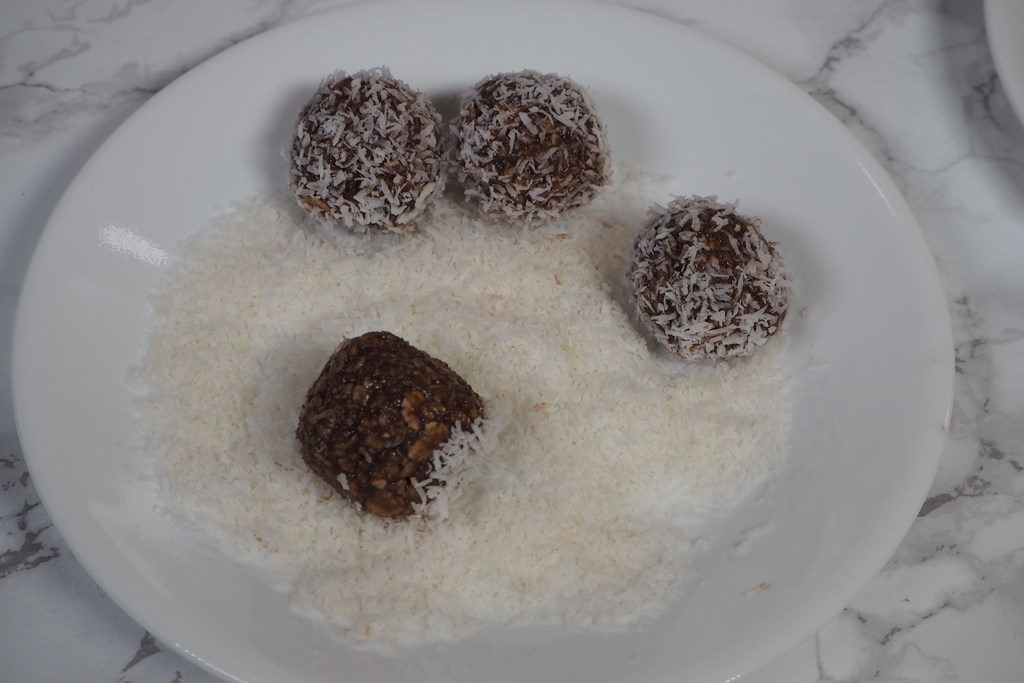
Step 5 (optional): Roll in shredded coconut…
…or sprinkles. Or something else you can think of, liked chopped hazel nuts. Or follow the other suggestions above to make them as delicate as the treats on the cover photo!
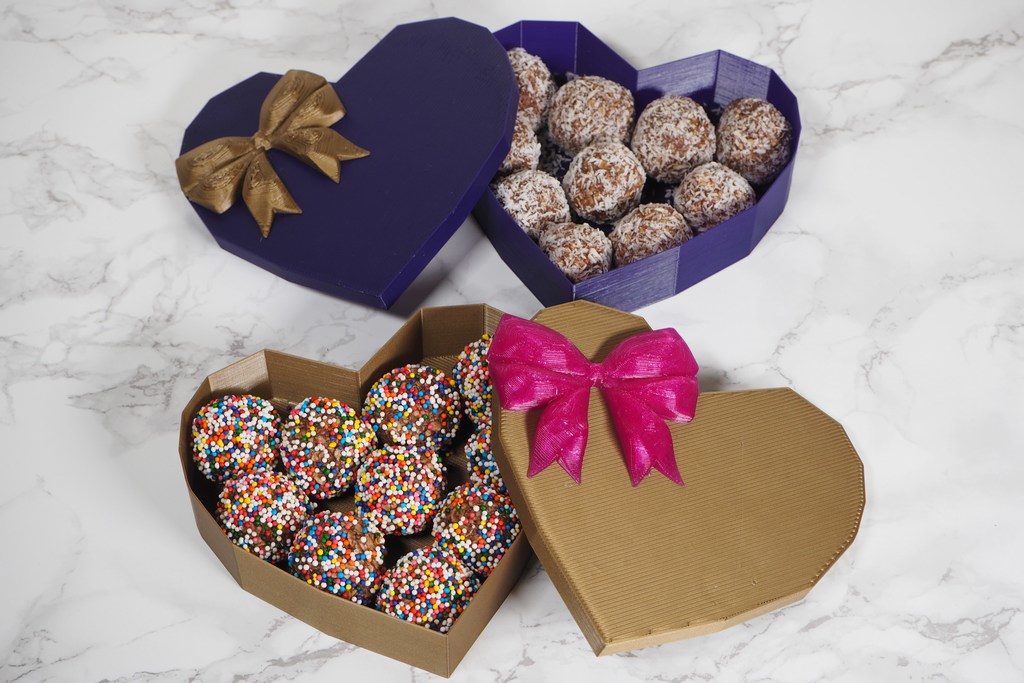
Step 6: Chill, and then place in a nice box, or just eat them directly! Store them in the fridge. Sorry, the files for these boxes are not posted, they are quite tricky to print.
4. Green Envy and KillaJoule Easter Eggs (or gift container for any occasion)

Updated April 7, 2020
I love to give away Easter Eggs, but I think the ones in the stores are both boring and expensive. For the last few years, I have made my own with 3D printing.
This year’s “egg” features the Green Envy (of course!) and has room for homemade treats (or store bought candy, if you prefer that). It isn’t really an “egg”, but rather a streamliner shaped container. That makes it a perfect gift no matter what you celebrate – Easter, Spring (if you are in the Northern hemisphere), Autumn (if you are in the Southern hemisphere) Passover, Ridvan, Qing Ming, National Tartan Day, ANZAC Day, Day of Silence or any of the other holidays around the world that happens this time of the year.
This year’s Easter Egg is improved from last year’s design. In the old design, you had to use some very specific 3D printer settings. I have fixed that in this design. You just import the STL files into your “slicer” software, and print them like all the other gadget that I am sure you like to print. 😉
The Easter Egg comes in two versions: as the “Green Envy” and as the “KillaJoule”. They both have the same lid with the characteristic lightning bolt (I am working with a design with the vine that Green Envy features, but didn’t get done on time). The bottoms come in two version: one that says “Green Envy Goody Enclosure” and one that says “KillaJoule Candy Container”. Pick your favourite, or print both! 😀 Download all three files in a ZIP folder HERE.

I have printed my eggs on my Creality Ender 3 and 3X (review here), on my Prusa i3 MK2S and on my Lulzbot Taz 5, and I “sliced” the 3D file using the free, open-source software Cura. With my settings, the bottom took about 3 hours and the lid about 2 hours. If your printer has a small print bed, you might have to place the model on the diagonal to fit it.

If you think 3D printing is exciting, and you don’t yet know CAD – teach yourself! It will open a whole new world of creativity that you didn’t even know was there! You will never look back. There are tons of tutorials, particularly on YouTube. Unless you have access to a full-blown CAD package such as Solidworks or Autodesk Inventor through school or work, I suggest you check out TinkerCAD or Autodesk Fusion 360. TinkerCAD and Fusion 360 is both free for hobbyists.
Years ago, when I worked at the University of Auckland, I created online CAD courses. However, it is time consuming to keep them updated when they release new features in the programs. Some of my courses are still online and you can check them out, but please notice that they may be outdated. In this course, you can design an Easter Egg, and it is suitable for the absolute beginner: https://cadenvy.com/course/fusion-360-2-easter-egg/.
![]()
5. 3D print your own Green Envy or KillaJoule – with a matching Eva!

If you have access to a 3D printer, you can print your own “engineering action figure set” with the KillaJoule, the Green Envy, and myself. Click here to download a Zip folder with the .STL files. To open the folder, right-click (on a PC) and select “Extract all”.
Both of the models are approximately in 1:60 scale. The KillaJoule is 100 mm long, the Green Envy is 115 mm long , and I am 27 mm tall. The model of me, I mean. I am slightly taller – a whopping 1.58 m (5′ 2″).
The KillaJoule and the Green Envy models must be printed with support (see photo below), while Eva can be printed with or without support. Eva comes out better with support, but the support material can be difficult to remove from the inside of the helmet (you can see a little bit of support material left in the helmet on the cover photo). I suggest you try without support first.
If you live in New Zealand and you are a 3D print fan, I do have to take the opportunity to promote my own business – KiwiFil. We manufacture 3D printing filament from PLA pro, rPLA, and rPETG, right here in Auckland, New Zealand. The more filament you buy from us, the faster the Green Envy will become, because all the profit goes to my expensive racing habit. 😉

If you don’t have a 3D printer, but a regular printer, you can make a KillaJoule from a regular piece of paper! Many years ago, I created this KillaJoule paper model, and you can download it here as a PDF document. I will probably never find the time to make one for the Green Envy, but if you create one, I will be delighted to post it here.
Slightly thicker paper – like 130 g presentation paper – works a little better than regular printing paper. Use glue or double-sided sticky tape to assemble it.
Enjoy!
// Eva

